Autonomous authentication is a method for enabling applications to act on behalf of users to interact with SmartVault without disclosing the users’ usernames and passwords or your Client ID. In addition, using this technique allows a user to revoke an application’s access to his or her private data at any time.
There are three performers in the autonomous authentication process: the user, the application running on a web server, and the server provider. The application is the one trying to access the user’s private data. The user is the one who wants to use the application and allow it to have access to his or her private data. And last but not least, the server provider is where the user has his or her private data stored.
The following diagram demonstrates the autonomous authentication process:
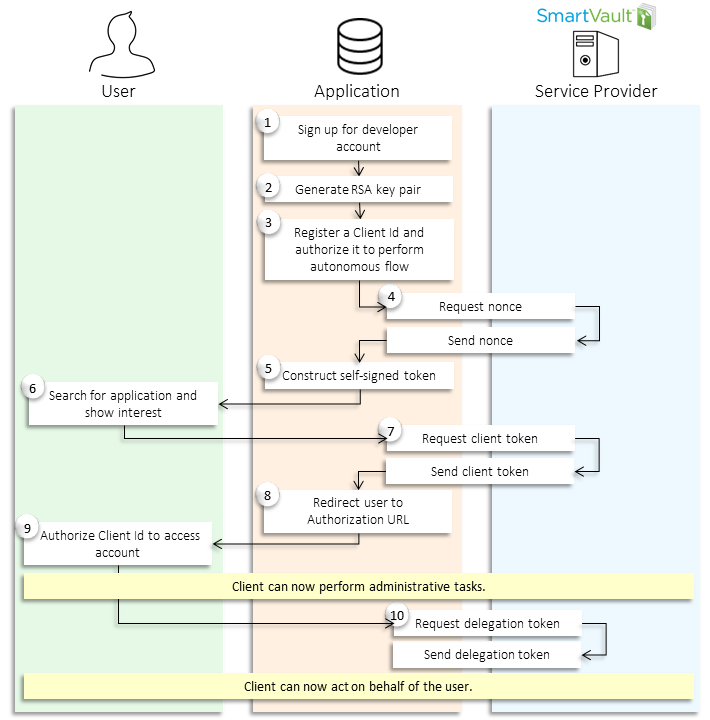
To be able to offer your application to SmartVault users, you’ll need to sign up for a developer account. Next, you can use OpenSSL to generate a RSA key pair. Register a Client ID from your developer account. This Client ID will uniquely identify your application. You will need to authorize this Client ID to perform autonomous flow and upload the public key you created for this application.
Your next step will be to request a nonce from SmartVault. You’ll use this nonce, along with your Client ID and private key, to create your self-signed token, which will be used to prove to SmartVault that your application is who it claims to be.
Once a user has found your application and asserts that he or she wants to be able to do all the cool things your application offers, you are ready to begin the autonomous authentication process. First, you’re going to need to redirect the user to SmartVault so they can sign in and authorize your Client ID to access their SmartVault account. Consequently, you will trade in the self-signed token you created earlier. Once SmartVault receives this, it will authenticate your application and authorize your access by handing you a client token. You can exchange your client token in for a delegation token, which will allow you to impersonate the SmartVault user. You can now delegate on behalf of the user using basic authentication — the username will be the user’s email address and the password will be your token. Because the token will be something akin to a password, it is important to keep it protected and secure.
SmartVault’s API uses OAuth 2.0’s protocol to perform authentication and authorization. It is very secure and makes web, mobile, and desktop application interaction possible. If suitable for your situation, rather than implementing all the details for OAuth, you may want to consider using SmartVault’s libraries, which already have OAuth’s protocol implemented.
Here are some helpful links if you want to dig deeper into OAuth:
- oauth.net
- oauth.net/articles/authentication
- hueniverse.com/2010/05/15/introducing-oauth-2-0
- oauthbible.com
- oauth.net/code (you can find OAuth libraries for different programming languages here)
Is there any way for the user to be redirected back to the client application after step 9?
Thanks, Dave
0
Hi Dave,
What you’ll need to do is add “&redirect_uri=https://your.uri” after your authorization uri.
Hope it helps!
0